User Guide
Overview
Thank you for using our data! All data in the Deep Blue Data repository are available to anyone for download without restriction, but before you get started, please remember:
- Content downloaded from Deep Blue Data is provided "as is." Just as with published books or articles available through the library, the library only makes the content available. Although we run a virus check on deposit of the data, no check is 100% accurate or foolproof. We therefore cannot guarantee the accuracy, adequacy, quality, or completeness of content from Deep Blue Data, or that downloads are absolutely free of viruses or other harmful components.
- Use of our data is subject to our terms of use and the license assigned by the depositor. In addition to understanding our Polices and Terms of Use, be sure that you understand the license and what you may and may not do with the data without requesting further permissions from the dataset contact. Most of our works (but not all) are licensed under the Creative Commons; please see their site for more information on these licenses.
- We collect usage data to help us improve our services. For more information on the data we collect (and how to opt out of this process), see the U-M Library’s policy on privacy and confidentiality.
If you have any questions, please feel free to contact us.
There are two pathways you can use to download our data: downloading locally (for smaller files) or downloading using Globus (for larger files).
Downloading Data: Smaller Files (Local)
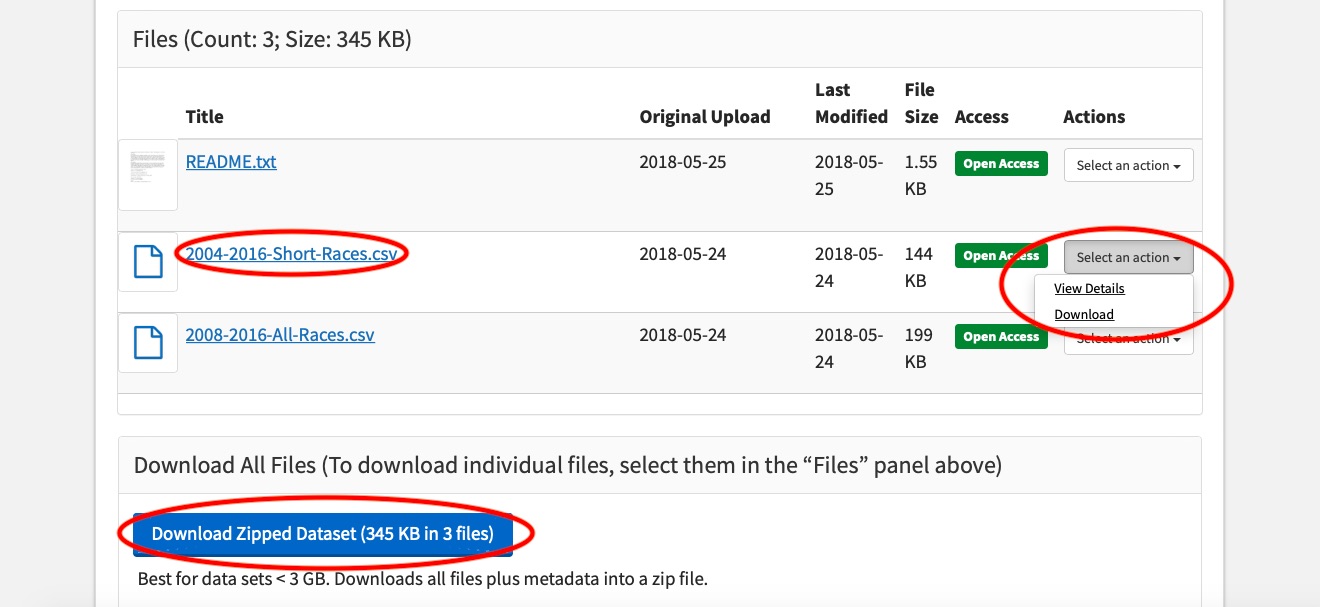
Most data within Deep Blue Data can be downloaded by simply navigating to the web page of the work of interest and clicking on the file(s) you want to download under the "Files" heading. You can also select "Download" on the "Select an Action" menu to the right of the file name. If you want to download all of a work’s files simultaneously, simply click "Download Zipped Dataset" under the "Download All Files" heading.
Downloading Data: Larger Files (Globus)
Most files on Deep Blue Data can be downloaded directly from the Work, but some files are so large that timeouts and errors can occur when trying to retrieve them through a browser.
To access these larger files, you can use Globus. For those who use Deep Blue Data frequently, Globus also may end up serving as a more convenient way to access files of all types and sizes.
What is Globus, and why do I need it to access files on Deep Blue Data?
Globus is a nonprofit platform created by the University of Chicago and Argonne National Laboratory that enables the simple transfer of digital files as large as petabytes (a petabyte is 1,000 terabytes or 1,000,000 gigabytes) from established endpoints, one of which can be your work or personal computer.
How do I set up Globus so I can transfer files to my computer?
Below is a short guide for setting up Globus on your computer. Globus also has detailed "How To" walkthroughs for basic and more complicated setup processes.
Set up an account on Globus
The first step is to set up an account with the Globus Web App, which can be connected to other personal and institutional accounts, including those at the University of Michigan. To begin setting up an account, navigate to the Globus login page.
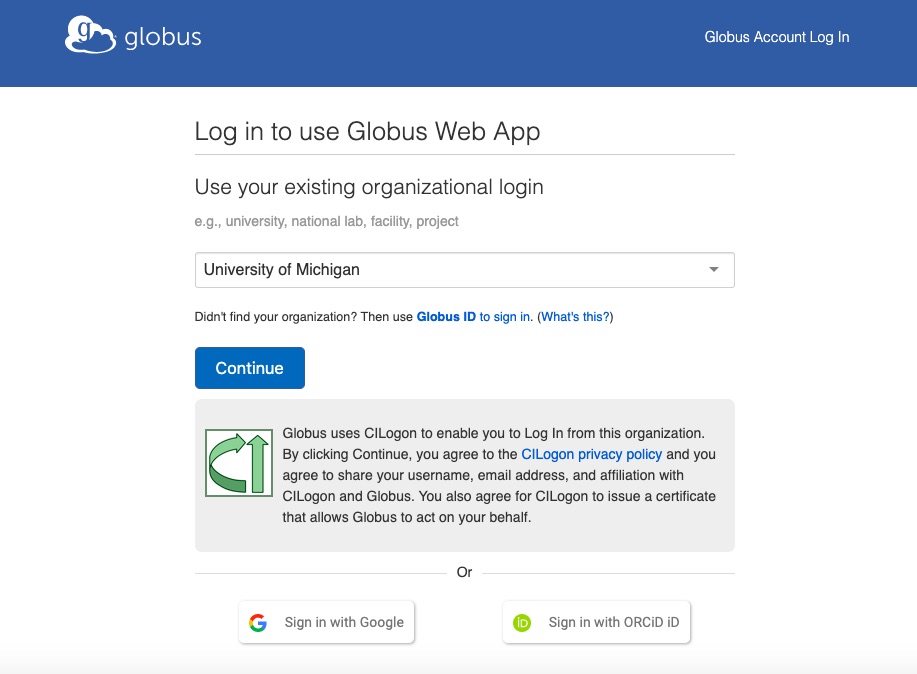
In the drop-down menu below "Use your existing organizational login," if the name of your institution is listed (e.g. University of Michigan), select it, click "Continue," and sign in using your institution’s login system. If your institution is not listed, or you would prefer to use a non-institutional email, click "Sign in with Google" below the "Continue" button. If you do not have a Google account, you may create an account using Globus ID.
When you are asked if you want to link to an existing Globus account, click "Continue." You will then be prompted for some additional information, including how you plan to use Globus (i.e. for commercial or academic purposes), and you must agree to the Terms of Service and Privacy Policy.
Install Globus Connect Personal
Once you have set up a Globus account, you will want to establish a personal endpoint on your computer so that you can transfer data to it. To do this, you will need to download and install Globus Connect Personal, which will connect to the Globus Web App.

To begin, navigate to https://app.globus.org/file-manager/gcp. For Step 1 ("Name Your Endpoint"), provide a descriptive name for the endpoint that will help you identify it in the future (e.g., Sam's Personal Laptop). For step 2 ("Generate a Setup Key for Installation"), click "Generate Setup Key," copy the result, and keep it in your clipboard or paste it in another document. Then, select your operating system from those listed in "Step 3" ("Download & Install Globus Connect Personal") and complete the installation setup. Most default settings are satisfactory, though later you may want to change the folder, or directory, to which Globus sends transferred files. During the installation process (or when you first open the program, depending on your operating system), you will be asked to provide the Setup Key you copied earlier.
You can find detailed installation instructions for Mac, Windows and Linux operating systems at https://www.globus.org/globus-connect-personal. On the instructions for Mac and Windows, the Configuration section will tell you how to change the folder that Globus can access. (In particular, you may need to set the destination folder as writable for transfers to be successful.)
Now I have Globus set up. How do I get the files I want from Deep Blue Data?
Once you have an account and Globus Connect Personal is installed on your computer, you have everything in place to begin transferring files from Deep Blue Data. Follow the steps below to complete the transfer process.
Send files to Globus
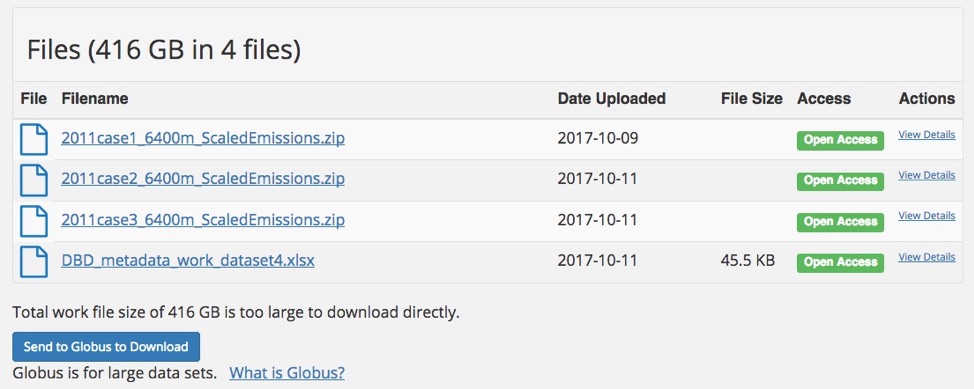
Return to the Work in Deep Blue Data from which you would like to transfer files to your computer. There will be a button labeled either "Send to Globus to Download" (image A, below) or "Link to Globus Download Directory" (image B) just beneath the list of files and the button labeled "Download All Files."
(A)
(B)
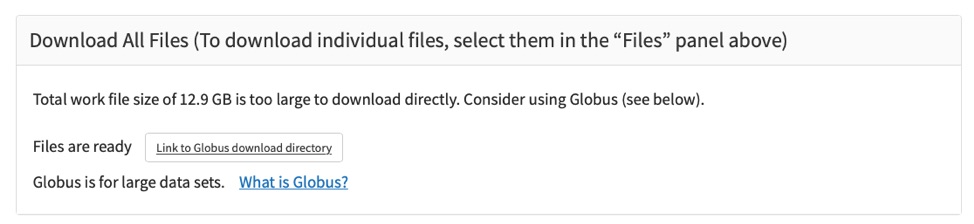
If there is a button labeled "Download Data from Globus" instead of "Send to Globus to Download," the files are already available for transfer because another user previously requested them. Click "Link to Globus download directory" and log in to your Globus account if prompted.
If there is a button labeled "Send to Globus to Download," click the button to begin the copying process. If prompted, log in to your Globus account. Globus will then prepare the files for download. How long the process will take depends on the size of the files.
If you are a University of Michigan affiliate and are logged into Deep Blue Data, you will automatically receive an email at your "@umich.edu" account when the files are ready for transfer. If you are NOT a University of Michigan affiliate and are not logged in to Deep Blue Data, a page will appear asking if you would like to provide your email address so that you can be notified when the files are available for transfer. That window will have two text boxes to fill ("Email" and "Email again"):

If you would rather not provide your email, you can click "Don't Add My Email" and return to the page on Deep Blue Data later to see if the files are available. However, we highly recommend you provide Deep Blue Data with an email, since it may take some time for the files to be ready.
When you receive an email notifying you that the files are available in Globus, click the Globus link provided in the email. If you did not specify an email, return to the dataset page on Deep Blue Data to check if the "Send to Globus for Download" button has been replaced with the "Link to Globus for Download"; if so, click "Link to Globus for Download" to continue.
Specify your device as an endpoint in Globus
After you have either clicked the Globus link provided in your email or the "Link to Globus for Download" button in the Work on Deep Blue Data, a page titled "File Manager | Globus" should appear:
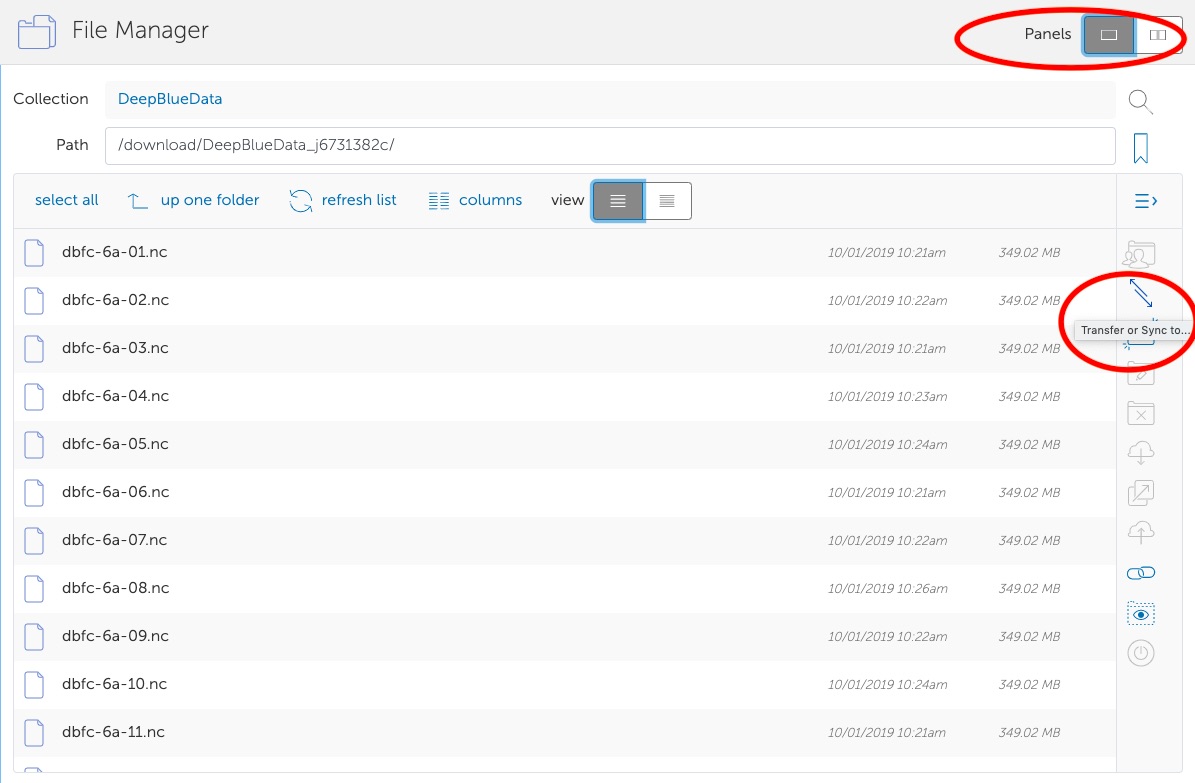
"DeepBlueData" should appear in the "Collection" field, which represents the main location for all of Deep Blue Data’s deposits on Globus. The "Path" field represents a unique pathway to the specific files for download. There is no need to alter anything in these two fields, since all the files for download should appear in the list below.
Click on the second "Panels" icon in the top-right corner. Alternatively, you can click on the icon with the tooltip "Transfer or Sync to…" on the right-hand icon menu in the single-panel view. In either case, a page with two "Collection" panels should appear:
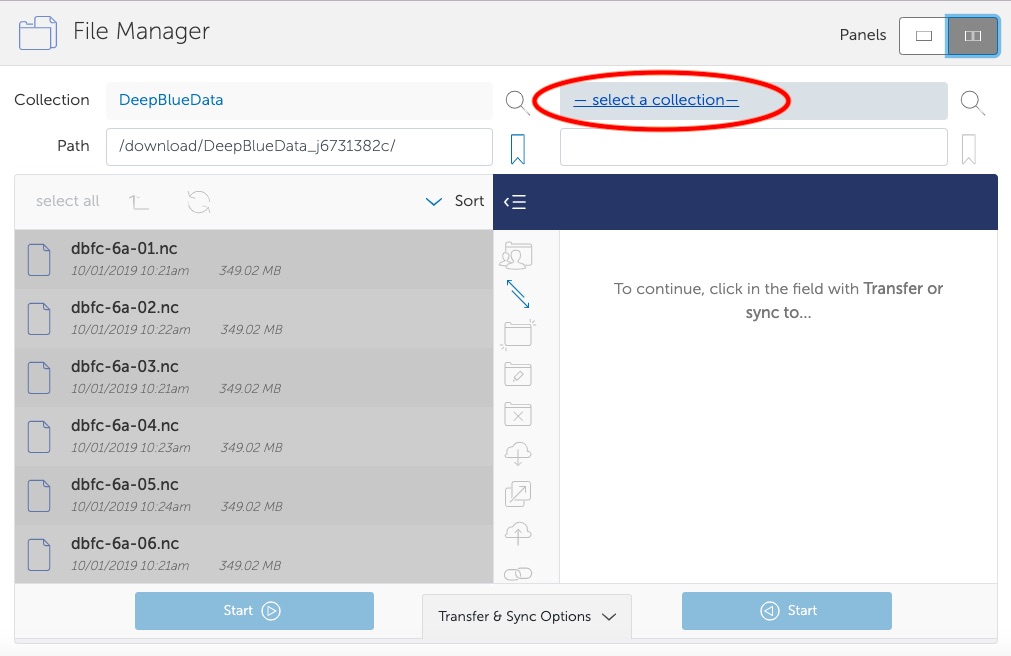
The second (right-hand) "Collection" panel represents your personal endpoint where the data will transfer, i.e., your computer. Click "– select a collection –" in this field to select your endpoint. Then, you can either search for your personal computer in the search bar or find it under the "Your Collections" tab.
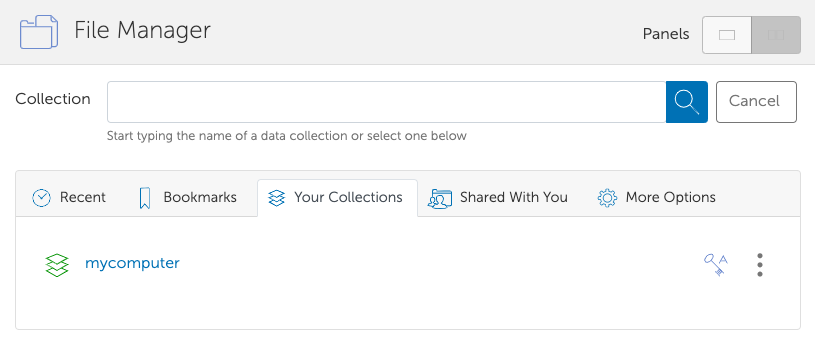
In the "Your Collections" tab, your endpoint icon will be green (with the icon tooltip reading "collection ready") if your device is ready to download files from Globus. If the icon is red with an "x" (or if the icon tooltip reads "collection offline"), please check that Globus Connect Personal is running on your computer (for additional information onthis, please refer to https://docs.globus.org/how-to/get-started).
Download files from Globus to your device
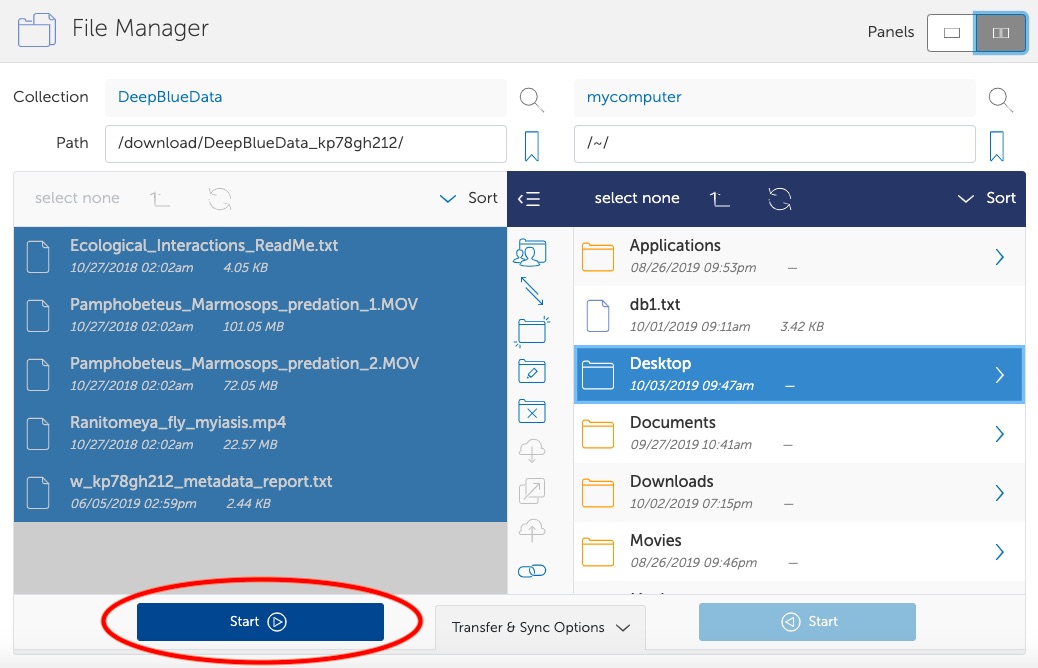
After selecting your Collection endpoint, select the files you would like to download from the "DeepBlueData" collection in the first (left-most) panel. You may either click "select all" above the list of files or select only the files you would like to download.
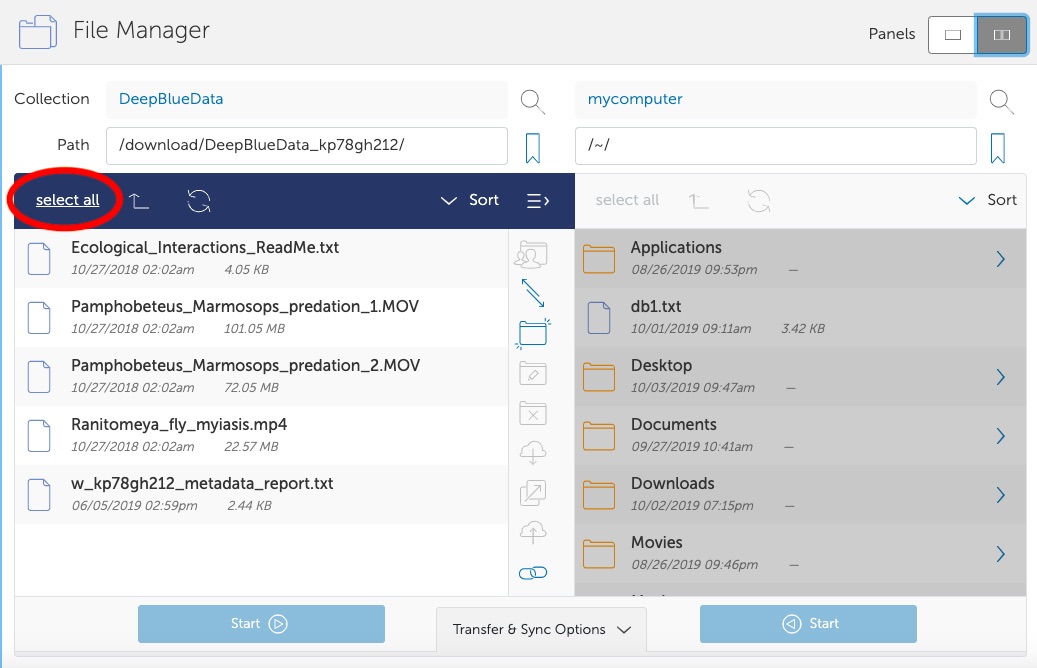
In the second (right-hand) panel, select the location where you would like the files to save on your computer. If you do not select a location, Globus defaults to whatever location you previously set up in Globus Connect Personal.
When endpoints for both sides are set, the "Start" button below the list of "DeepBlueData" files will turn darker blue and will be clickable. Click on this "Start" button to download your files.
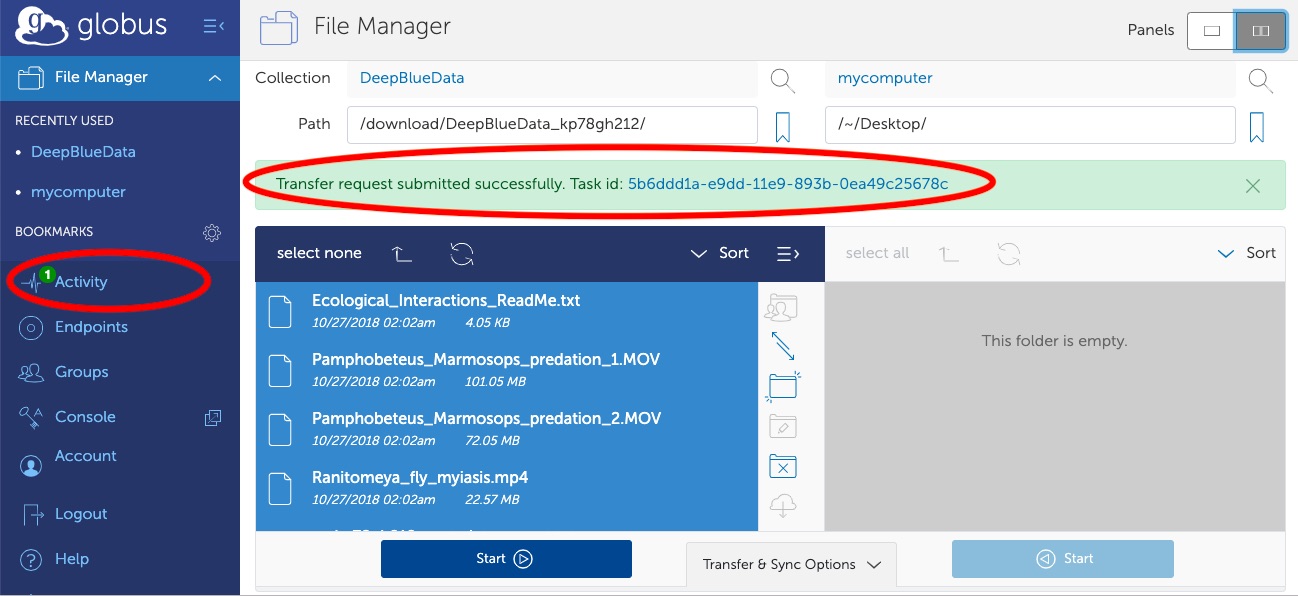
A message in a green bar (reading "Transfer request submitted successfully. Task id:...") should appear above the file window, indicating a successful transfer request. Because Globus is expected to handle large files that take some time to download, the platform is set up to pause whenever your computer is no longer connected to the Internet. It will resume automatically when your computer is reconnected.
Once the files have been completely downloaded, they will appear in the destination folder on your computer. You can always check the status of tasks by clicking "Activity" in the left-hand navigation on the Globus page where you set up your transfer. If you provided an email or are signed in with your U-M account, you will receive an email when the transfer has been completed.
Where can I go if I need further help with Globus or Deep Blue Data?
Globus has numerous How To guides on its Globus Docs website, including videos. You can also contact us.
Note about Globus
By default, Globus Personal Connect will automatically turn on in the background when you start your computer. When you are not using Globus, to avoid receiving error messages and other notifications, simply find the Globus icon in the bottom right-hand corner of your screen (or in the menu/status bar at the top for Mac), right-click (or ctrl-click for Mac), and click "Quit Globus Personal Connect."